


How to Lube Mechanical Switches
HOW-TO
Lube Mechanical Switches
Overview
Lubing produces smoother feeling and better-sounding switches to elevate your typing and gaming experience.
Familiarize yourself with the parts of a switch before getting started.
Note that the metal leaf should not be removed from the switch.
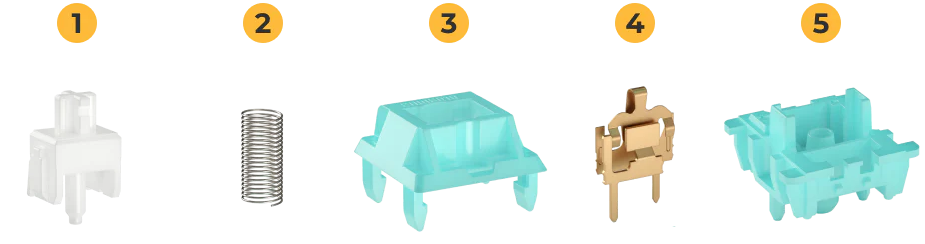
1
Stem
2
Spring
3
Top Housing
4
Leaf
5
Bottom Housing
1
Stem
2
Spring
3
Top Housing
4
Leaf
5
Bottom Housing
Some things to note before lubing your keyboard switches:
• Do not use petroleum jelly, such as Vaseline, to lube your switches. It will damage the plastic and degrade your switches over time.
• We don’t recommend lubing Kailh Box switches. They have a housing design that will leak lube into your keyboard and may damage it.
How to Lube Switches
The Glorious Lube Kit has everything you need to lube your switches, but we also sell each component separately.
Tools Needed:
• Keycap Puller (if the switches you're lubing are currently in a keyboard)
• Switch Puller (if the switches you're lubing are currently in a keyboard)
• Switch Opener
• G-Lube
• Lube Brush - ours is Bristle Size 00
• Lube Station (recommended)
In addition to the items included in the Glorious Lube Kit, you’ll need a clear workspace to get started. You may also want tweezers for handling small parts and newspapers to lay down in order to keep your table or desk from getting greasy.
We recommend applying lube to just 4 switches to start off with. This will allow you to test those few for feel and decide whether to apply more or less lube to the rest of your switches.
Instructions
1. If your switches are currently in in your keyboard, unplug the keyboard and remove the keycaps and switches using the keycap and switch pullers.
2. Open each of the switches using the switch opener.
3. Lube the floor of the lower housing, as well as the inside & outside of the cylinder where the stem & spring sit.
4. Lube the stem rails and the cylindrical part where the spring contacts the stem. You can also apply a thin coat of lube to the stem legs, but be aware that this may dull the feel of tactile switches like Glorious Pandas.
5. Lube the upper housing where the rails of the stem contact the housing.
6. Lube the springs. You can individually coat the ends with a small amount of lube. Alternatively, you can distribute lube throughout the inside of a Ziploc bag, add your springs, and shake to evenly coat.
7. Reassemble the switches by lining up the parts and snapping them together. Be careful of the metal leaf. Actuate the switch a couple times to ensure that it feels right.
• If it feels off, you may need to pull it apart again.
• If your switch feels scratchy, you may have applied too little lube.
• If your switch has visible globs of lube or feels mushy, you may have applied too much lube.
8. Install the switches into the keyboard by lining up the legs with the sockets and pushing them into place.
9. Reinstall your keycaps, plug in your keyboard, and test the switches by opening a word processor. If a key isn’t working, ensure that the switch is installed correctly and that the metal leaf inside is undamaged.
Additional Links
Support
Questions or concerns regarding your Glorious keyboard, switches, or modding tools can be directed to our support team.
Note that Glorious is unable to offer comprehensive support for parts (switches, stabilizers, modding tools, etc.) purchased from other companies.
Warranty
Important Notices
• 1 year limited manufacturer warranty for Glorious Lube Kit
• Warranty does not cover damages resulting from the changing or opening of switches.
• Switches, switch components, and other small objects could be swallowed.
• Keep out of reach of children below the age of 10.